Posts

Showing posts from April, 2018

The Bowl

Image
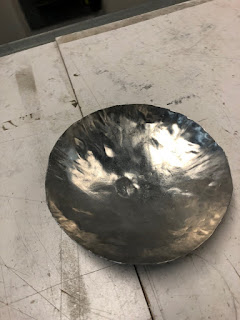
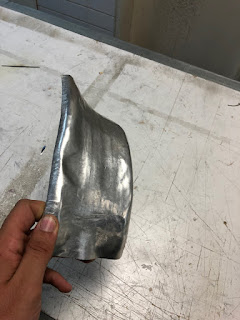
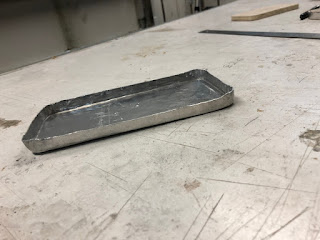
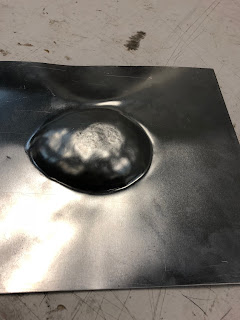
The Bowl: In order to form the bowl as best I could, I used a method with various steps to ensure I achieve consistency in the finish of the bowl and also symmetry in the shape of the bowl. In addition to this, this module illustrated the uses of stretching metal and made me think of the various applications this could be used for in the formation of other pieces of metal. Initially, I had marked out where I was going to cut the metal using a sharpie. Following this, I used a pair of left curving tin snips to cut out the shape. Consequently, through the use of tin snips to cut the edges, it was to no surprise that I had sharp edges on the perimeter of my bowl. To mitigate this I used a metal file to smooth the edges as best I could,for two reasons, 1. for functionality and 2. for ease of formation while I was working with it and to avoid injury. Upon completion of filing the edges, I began to strike the piece with an array of different rubber mallets in order to take the shape

The Reverse Curve

Image
The Reverse Curve Personally proving to be the most challenging module for me, the torus was an interesting task that helped me understand the challenges associated with achieving symmetry and the importance of symmetry in this task. Despite the number of times I had failed to correctly form the torus, I was able to achieve some sort of shape by using a rubber mallet to strike a piece of timber to achieve the majority of the shape. Upon completion of this, I attempted to use the English wheel to for a bent appearance. In addition to this, I used a metal hammer to strike the edges of the torus, to achieve a somewhat more defined and smoother finish.

The Tin

Image
The Tin: In an attempt to create a pair of tins that would sit on top of each other to form something in the likes of a pencil tin, unfortunately I was unable to pair up with a class member to create the pair, however in saying this I was able to adopt a method of formation that allowed for a piece of metal to somewhat take the shape of half of the pencil tin. Proving to be a little more difficult tocreate when compared to the blister, the tin was relatively brittle and broke on one occasion. However, by using a mallet to form the edges of the tin and 'wrap' the metal around the timber mould and again, the back end of a rubber screwdriver to smooth out the edges in the corners of the tine, I was able to produce the below.

The Blister

Image
The Blister: The formation of the blister had proven to be a relatively easier process using the method of formation I had adopted in the process of making the blister. This method included sandwiching a metal piece between two timber moulds. The timber moulds dictated the shape the the blister was going to adopt.  To form the blister I simply used a rubber mallet in the centre to give the blister its shape. Once the Blister had taken shape, I employed the bottom end of a screwdriver with a rubber handle to beat the edges of the blister to allow for better curves around the edge. Once the blister had taken shape, I used the back end of the rubber mallet to form the peak of the blister as this was relatively narrow and allowed for a distinct peak to the blister.